

處理器:ATTiny85
記憶體:2KB尺寸:直徑25mm,厚度 4mm
GPIO:5 (保留一組供上傳程式用)
連接:micro USB
一顆紅燈顯示電源
一顆紅燈與pin 1連動
PWM on 3 pin
安裝其中的DPinst64.exe(64位元)
(2)檔案-->偏好設定,在「額外的開發板管理員網址」輸入
http://digistump.com/package_digistump_index.json
(3)工具-->開發板-->開發板管理員,搜尋 Digistump AVR Boards AVR Boards,並安裝。
(4)工具-->開發板選擇 Digispark (Default - 16.5mhz),port不要選。
(5)Arduino IDE輸入以下程式並上傳(此時板子不要接)
// the setup routine runs once when you press reset:
void setup() {
// initialize the digital pin as an output.
pinMode(0, OUTPUT); //LED on Model B
pinMode(1, OUTPUT); //LED on Model A or Pro
}
// the loop routine runs over and over again forever:
void loop() {
digitalWrite(1, HIGH); // turn the LED on (HIGH is the voltage level)
delay(1000); // wait for a second
digitalWrite(1, LOW); // turn the LED off by making the voltage LOW
delay(1000); // wait for a second
}
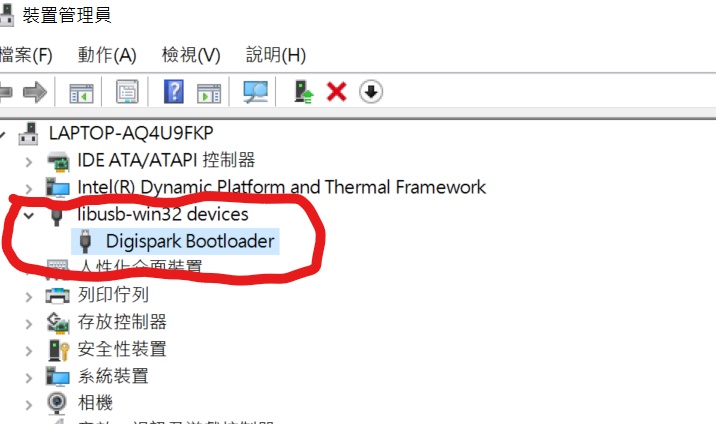
(6)出現Plug in device now... (will timeout in 60 seconds)
才接上板子,就會自動抓到板子並上傳程式。
參考資料:
http://digistump.com/wiki/digispark/tutorials/connecting
https://diyprojects.io/tutorial-program-cjmcu-attiny85-lilytiny-lilypad/#.Xhp82sgzY2w
https://www.electroschematics.com/learn-to-use-attiny85-usb-mini-development-board/
http://ruten-proteus.blogspot.com/2015/03/attiny85-dev-board-guide.html
https://goods.ruten.com.tw/item/show?21509520818045
購買與中文簡介
https://goods.ruten.com.tw/item/show?21849143093431
https://www.icshop.com.tw/product_info.php/products_id/10549